Showing posts with label tutorials. Show all posts

Friday, October 23, 2015

Pattern layout for my Embroidered Shift


Here's the pattern and layout for the embroidered shift. I'm very excited to have gotten this done!
 I learn more about Adobe Illustrator each time I use it.

(for reference, I'm a size 12/14, with a 42" bust measurement. 
Yeah, I totally just put that on the internet. See what I do for you?)
Enjoy :) 


Saturday, July 12, 2014

Cinderella dress padded hem tutorial

How I did the hem on the Coello dress

So, I'm writing this tutorial because I think that hems do not get enough discussion and they are really important. They are especially important when they are done badly.
(And who among us has always done perfect hems? Not me, that's for sure.)

Before I start with the steps and the pictures, I want to add all the caveats. 
This type of hemming is best for:
  •  Skirts that have curved hems, not skirts that are straight and are just gathered or pleated at the top.  Curved hems have difficulty being folded up since the whole geometry of a circle makes the outside bigger than the inside, and then when folded up, it's got to squish/gather itself even more. 
  • Skirts made of thicker silks, wools, velveteens, or upholstery fabrics. It's not for drapey slinky fabrics that really want a teensy double-fold hem. We called these Janet hems. Cause Janet did them better than anyone else I've ever seen. (She did a lot of things that way, though.) I miss her :(
  • Hems that will have trim put around them, like my dress did. This technique stabilizes the hem area, helping to prevent the trim from gathering or controlling the fall of the skirt.
  • Dresses that can be hemmed permanently, not for hems that might need to be let up or down. Once this hem is in, there are no alteration options.  (So get the length really right)
Ok - enough about that, read on.

Step 1: Find the hem line

For this, I put the dress on the dress form over the farthingale and I used this lovely tool to get a chalk line that was parallel with the ground:

If you don't have one of these - get one. Like, really. Your local JoAnns probably has it. Here's the first link I found for an online one: http://www.nancysnotions.com/product/deluxe+chalk+hem+marker.do

After finding the hemline, I took the dress to the ironing table and pressed the hem up. I discovered that I had very little "turn up" to work with in a couple of places, and that my turned up edge was very uneven. 

Hem pressed up - showing really uneven hem lengths.

 Step 2. Prepare the hem tape

I decided to use milliner's grosgrain (sometimes called Petersham) as a hem facing tape. Here's what it looks like straight:


and here it is after I've pressed in a curve:
Regular grosgrain won't curve like this. It won't curve at all.  I used this stuff because I had some in the right color, plus it's finished on both edges and  I know that it will curve nicely. You can also use single fold bias tape.

 I pressed a gentle curve into the whole length of the hem tape.

 Step 3: Attach the hem tape

I laid the hem tape on the hem and pinned it through just the folded up part of the hem, about 3/8" up from the hemline. I pressed the tape flat to make sure the tape's curve was all groovy with the hem curve.

I then took it to the machine, unfolded the hem, and topstitched the tape onto the hem right at the edge of the tape.


 When I came all the way around the hem, I folded the edge under and stitched it down.

 Just for my sanity's sake, I put it back on the form and made SURE it was level with the floor. Looked good :)

Step 4: Trim the hem edge so that it is shorter than the hem tape

Pretty self explanatory. But here's a picture :)


 Here it is all trimmed.

 Step 5: Pad the hem

The hem looked a little drapey/wimpy to me since I needed it to hold up a lot of flat trim and since the overall look of the dress is very stiff. I decided to pad it with some craft felt. I got this idea from one of the notes in Patterns of Fashion 4 (Janet Arnold) where it says that the hem was padded with a thick layer of wool. Since felt curves nicely and doesn't fray, I decided to use it instead of wool. Also - it's cheaper, and I had a bunch of it lyin' around :) I would absolutely use this product again - worked like a dream.
I cut 2" wide strips of acrylic craft felt, and joined the strips together with a zig stitch:


I then laid the felt right into the fold of the hem, and pinned it place.

 I curved the felt with the iron as I went to make it lie smooth and flat.


IMPORTANT: This next bit will vary depending on how you will be treating the outside of the hem.
IF: you won't be trimming the outside of the dress, I wouldn't recommend doing what I did here since it puts visible rows of topstitching on the outside of the dress. I would instead fold the hem out again and stitch just through the top edge of the hem tape and through the felt, and then do some kind of blind hem stitch at the top edge of the felt to hold it all up. That would work beautifully and be invisible form the outside. BUT - since I WAS going to put trim around the whole hem, AND I needed a guideline to use for that trim placement anyway:

 I stitched through all layers, using this wonderful little screw-in guide that I could NOT live without.  I have no link for you - mine came in a vintage sewing attachment kit. I think you can still get them, but I don't know what they are called.
 I ended up doing two rows of stitching, since I found that my first row was too high for the trim placement.

Step 5: Prepare the trim

Since I used trim I could curve, I pressed a curve into it before I laid it on the skirt. (which I really recommend - I'm a firm believer that there's just no really reliable way to get a beautifully trimmed curvy hemmed skirt with straight, unbendy trim. )
Here you can see that the bottom edge is bigger than the top edge. This is trim I assembled from three separate pieces, so I was able to ease one side on in order to facilitate this.

 Step 6: Attach the trim

Once again your mileage may vary, but I just lined the bottom edge of the trim up with my guideline and topstitched through all layers.


 I chose very forgiving trim that hid my top-stitches well, which is one of the great contributing factors of the success of this project.  I stitched the top edge of the trim down the same way.


Here's an image of the finished bottom edge, with both rows of trim in place. I love how the hem edge is nice and smooth due to the support of the felt.
The trim needed a good press here, but did lie nicely after it was pressed.

And that's it! At least that's how I did it on this dress.
Ironically, the silly picture shows off the finished hem the best.
Tha's ok. I like the silly picture :)


Hope this was helpful. Happy to answer questions, if you have any :)


Tuesday, June 10, 2014

Coello Cinderella dress sleeve

And now for something completely different, (at least for a hat blog)

I'm working on an Elizabethan dress based on this portrait. (Don't worry, I'll be making the hat too)

Why, you might ask?  To have something on which to showcase the awesome sparkly ouches and the girdle belt and Carcanet necklace :) of course. I estimate that with the jewelry and all, this will use about eighty of them. First, I have to make it, though.

I've  made great progress working on the bodice, including a sweet little upper sleeve puff with a zillion little darts in it and persnickety little pickadills.

In fact - it was SO much fun, I made this process poster thing showing the steps I used to find the sleeve pouf pattern.


This sortof got my documentation bug going, and also got an enthusiastic response from fellow costume geeks friends.
I promised that I would document the process I used when I made the slashed and bedecked undersleeves. Without further ado, here is

The Slashed Sleeve Process


I drafted two sleeve patterns, one that is the base shape of a very straight, pretty boring sleeve, with no puffs, and another  that is exactly the same, but four inches longer. (I had done a sample of the slashes in order to find out the ratio of the larger sleeve to the smaller, which is how I came up with the four inches larger.)

On both sleeve patterns, I marked and notched the horizontal lines for the rows of trim and the spaces that I would slash, but it turned out that I only needed them on the larger pattern, and even on that, I used the ruler rather than my notches for the sake of precision. 

My assumption that the slashes needed to be on the bias was proven to be true by the samples I did, but I wanted the slashes to appear vertical,  so I cut the entire outer satin sleeve layer on the true bias. (This one is the larger pattern.)
 Then, I marked all the horizontal trim lines on the back side of the satin, and very carefully  marked the grid lines  (3/4" apart and 3/4" high) that will be the slashes.

Back side of satin sleeve - with grid all marked.
 I placed a rubber cutting mat beneath the satin, and used a box knife with a new blade and my clear ruler to make the slits. The biggest challenge was to do them cleanly with one cut, since going back over a cut made it not as neat.
 Here is the front view of the silk satin, with the slits all cut.

I cut out the smaller base sleeve layer from cotton drapery lining, which was thin but quite papery/stiff. This layer, I cut on the straight grain, like a regular sleeve.
 I lined the two layers up and pinned them at the cuff


On the satin side, I pinned the first row of the trim through both layers of sleeve, just below the first row of slits.
 And stitched it in place on both sides, using invisible nylon thread. (I did a number of samples with "real" thread - and this was by far the best looking result. Not my favorite stuff to work with, but sometimes it's the right tool for the job.) I found that a narrow zig-zag stitch was the least noticeable, which was a little surprising. I couldn't see the stitches at all.

 I pressed the trim flat, and went back to the cutting table.
 I placed a thick cord (I had to twist three together to make it thick enough) in between the two sleeve layers to create the ridge I wanted between the trim rows.
 You can see the ridge here
 I pinned the next row of trim in place below the next row of cuts, and gently pulled out the cord.
 Repeated this process with all rows of trim
 Another angle of the same thing.
 Here are all the rows of trim, all pinned in place.
 I then stitched all rows of trim through both layers of the sleeve, This holds all the puffs in place on the base sleeve. As I got higher up the sleeve, I rolled the stitched rows up and pinned the roll to keep the sleeve from being scrunched against the machine, and keep everything neat.

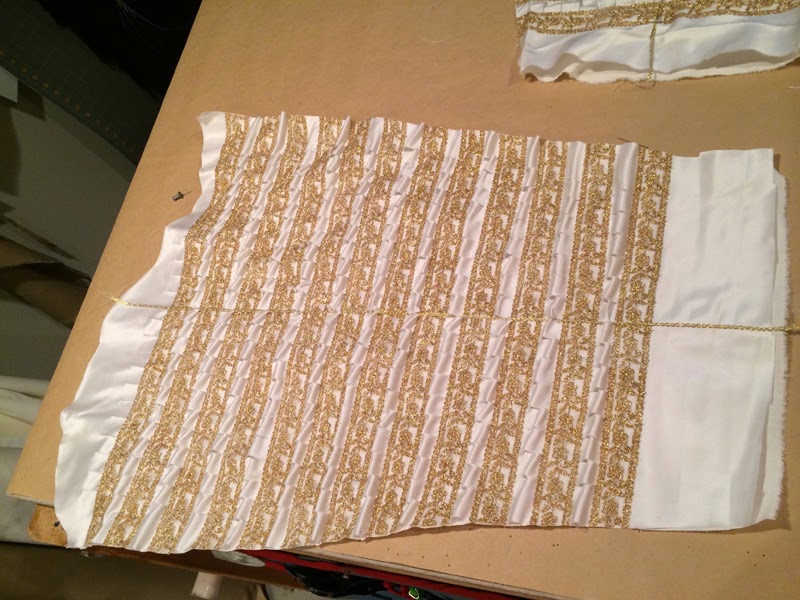
 Here's the sleeve with the trim rows all stitched down, from the back side.
 And here it is from the front.
 I stitched the single vertical row of trim down the center of the sleeve and trimmed all the raw trim edges down to a smaller seam allowance on the long seam edges.
I then pinned the sleeve seam, matching the rows of trim carefully, stitched the sleeve seam, and pressed the seam allowance open.

Here's the current state of the sleeve. Next, it will get little satin pickadills at the cuff, and then get a smooth, thin lining, and be otherwise treated like any other sleeve.
 (Here's an earlier version, before I added the vertical trim, but it's pinned into the doublet.)


The entire process took three and a half hours (not bad, really!)

Whew!

Now? I will go to bed.


Sunday, December 8, 2013

Pleating a French Hood Frill

As mentioned, here's my blog post about making the frill for a French hood. (the way I do it, anyhow.)


I use the uncrinkled metallic silk organza and a smocking pleater.

Start with a ripped strip of fabric about four inches wide that runs the width of the fabric (mine are about 45")
Fold them in half and pin them to the ironing table. Press a hard crease in the fold.
Here I've got several strips on my table. I  try to always do these things in batches.

Take the pressed strip to the sewing machine and stitch the two raw edges together, making sure that the layers don't slip at all. Grain must be really straight for the smocking pleater to do a good job.

Press the stitched strip flat again, making sure there are NO bubbles or twists in the grain.
Use pinking shears to trim the nasty, stringy edge off neatly. You can't have the stray loose threads tangling up in the pleater. If there is even one loose thread, it Will gum up the works.

Trim off the selvedge. It's bulkier than the rest of the fabric, and the pleater, as mentioned, is picky.

Here's a pressed, stitched, pinked, trimmed strip, ready to go into the pleater.
 

Now thread the pleater with invisible thread, making sure that the tails of the thread are at least 20" long, and tied all twelve ends together. I use six needles, just from trial and error.
 Four was definitely too few.

The trimmed, cut edge goes into the pleater, with the folded edge just barely past the far right needle. If it's too far to the right, the frill will have a ruffle/buckle in it. Too close to the needle and you run the risk of missing the fabric with that needle entirely.

As the handle (that I apparently do not show in ANY of these shots) on the right side of the pleater is turned slowly, the fabric feeds into the gears and is folded and forced onto the needles at regular intervals.


Edited to add photo of the whole smocking pleater:

And just cause they are cool, the curved, specialty needles they require:

Here's a video. You can thank my son who was enlisted to hold the camera,
 as this really takes two hands.
It's not gorgeous, but it shows you how it happens.

Plus - WOO! I uploaded a video!


 As the pleats feed onto the needles, you gently pull them off the edge and onto the thread tails. If they scrunch up too tightly, the needles break, and the whole thing is a wash.

I tend to then serge the pinked edge of the finished frill, just to make sure none of those loose threads ever get back in my way.

Next time - shaping the frill with steam!